
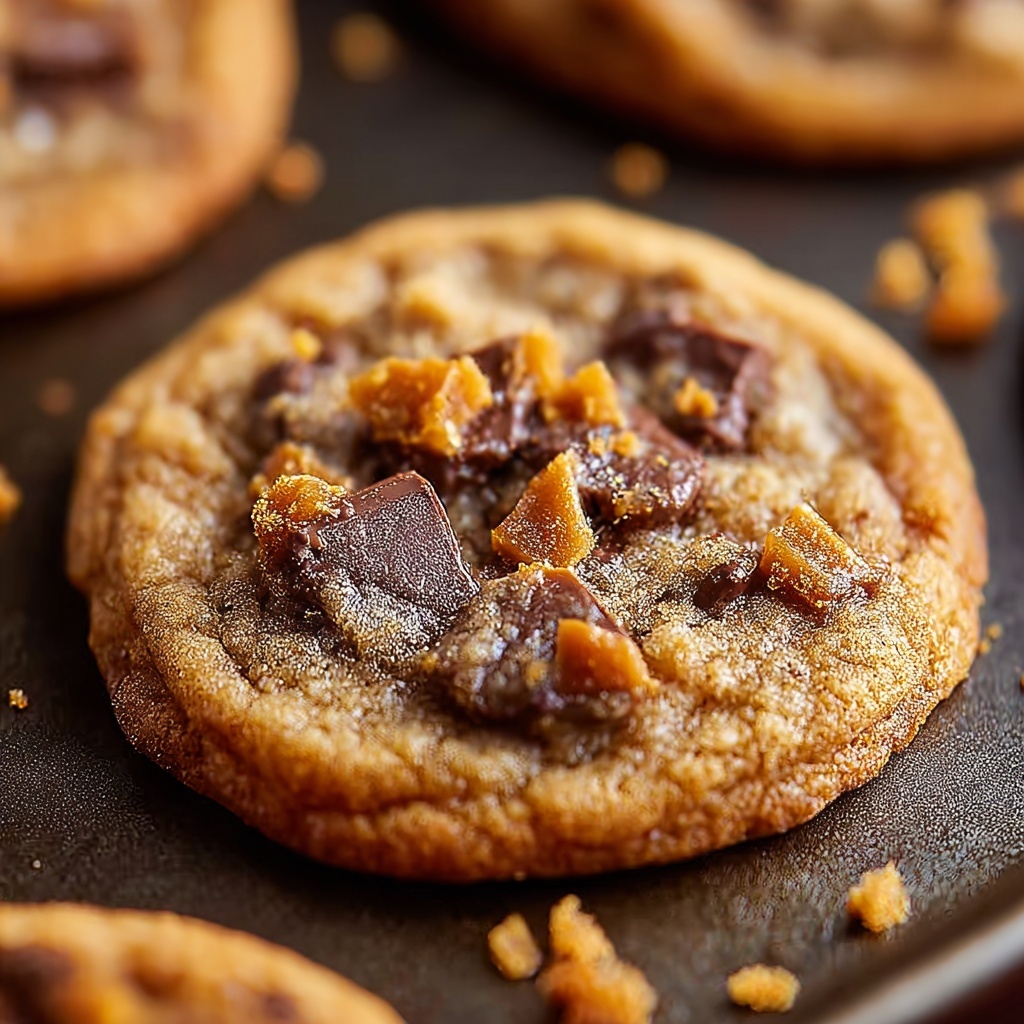
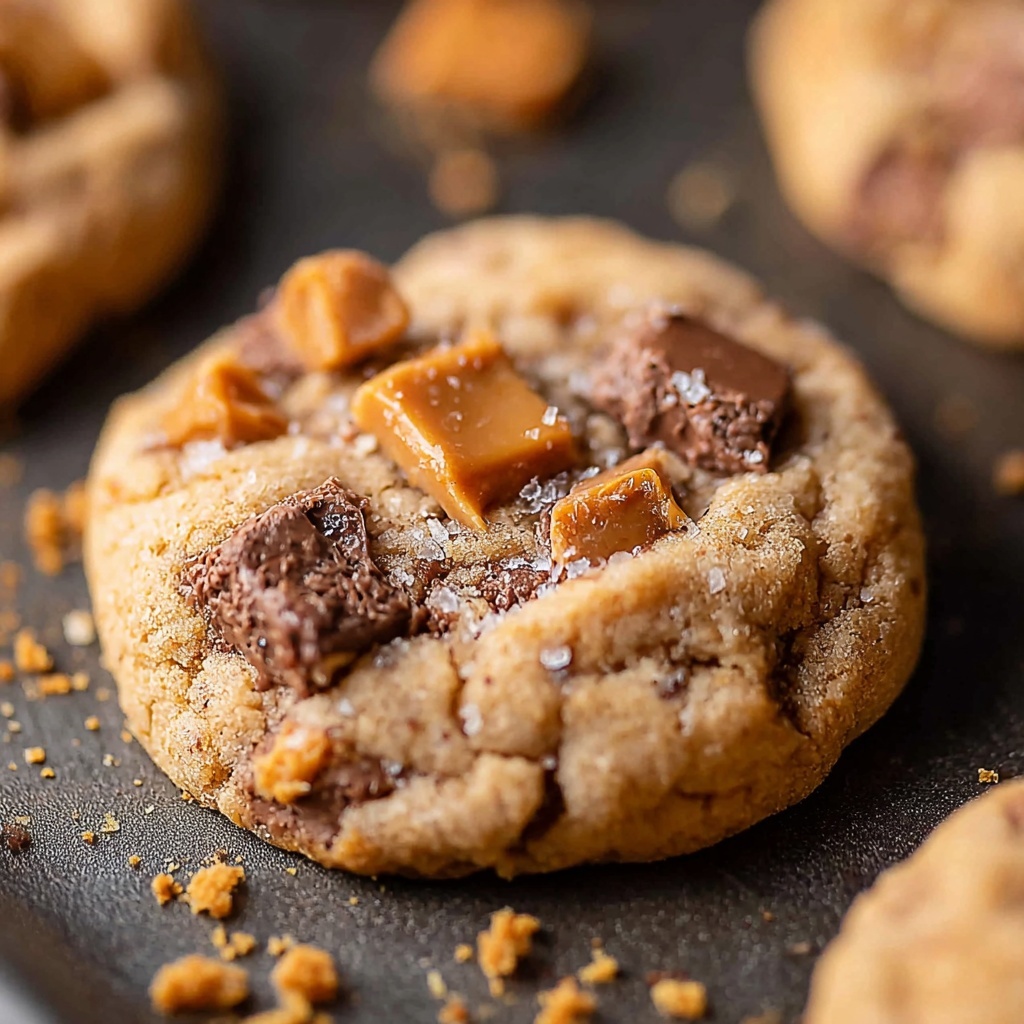
If you love the irresistible combination of creamy peanut butter and crunchy candy bar goodness, then you are going to fall head over heels for this Peanut Butter Butterfinger Cookies Recipe. These cookies are a delightful blend of rich peanut butter flavor with sweet, crispy Butterfinger pieces baked right in, creating a magical texture that’s both soft and satisfyingly crunchy. Whether you’re baking for a crowd or just craving a special treat, this recipe is easy to follow, and the result is a batch of cookies that will disappear faster than you can say “just one more.”
Ingredients You’ll Need
The beauty of this Peanut Butter Butterfinger Cookies Recipe is in its simplicity. Each ingredient plays a crucial role, from the creamy butter and peanut butter that ensure moistness and flavor, to the chopped Butterfinger, which adds that signature crunch and caramelized sweetness.
- 3/4 cup softened butter: Provides a rich, creamy base and helps the cookies stay tender.
- 1/2 cup granulated sugar: Adds sweetness and helps create a slight crispness on the edges.
- 1/2 cup brown sugar: Brings moisture and a subtle caramel note for depth of flavor.
- 1 cup peanut butter (preferably Jif): Delivers that classic peanut butter aroma and creaminess central to the recipe.
- 1 large egg: Binds everything together and gives structure to the dough.
- 1 & 1/2 teaspoons vanilla extract: Enhances all the flavors and adds a warm, inviting scent.
- 1 & 1/2 cups all-purpose flour: The foundation that holds the dough together.
- 1/2 teaspoon baking soda: Helps the cookies rise gently for a soft texture.
- 1/2 teaspoon baking powder: Adds a touch of lift and fluffiness.
- 1/4 teaspoon kosher salt: Balances sweetness and intensifies the peanut butter flavor.
- 16 ounces chopped Butterfinger: The star ingredient that gives the cookies their irresistible crunch and buttery sweetness.
How to Make Peanut Butter Butterfinger Cookies Recipe
Step 1: Cream the Butter and Sugars
To start off, cream together the softened butter, granulated sugar, and brown sugar in a mixing bowl until the mixture looks fluffy and pale. This step is crucial because it introduces air, helping your cookies have a light, tender crumb rather than a dense bite.
Step 2: Add Peanut Butter, Egg, and Vanilla
Next, stir in the creamy peanut butter, large egg, and vanilla extract. Mix well until the batter is smooth and glossy. This combination brings the heart of peanut butter flavor and the vanilla amplifies the sweetness, creating a harmonious undertone throughout the cookie.
Step 3: Incorporate Dry Ingredients
Gradually add the flour, baking soda, baking powder, and kosher salt to your wet ingredients. Mix just until combined—over-mixing can make your cookies tough. These components are what give shape and just enough rise to the cookies so they maintain their soft texture while holding those chunky Butterfinger pieces.
Step 4: Fold In the Chopped Butterfinger
Gently fold in the chopped Butterfinger candy bars. This step is like adding little pockets of caramelized, crispy magic throughout the dough. Make sure you distribute the pieces evenly so every cookie gets those crunchy, sweet bites.
Step 5: Chill the Dough
Pop the dough in the fridge for at least 15 minutes. Chilling helps the dough firm up, which in turn prevents the cookies from spreading too much while baking, so they keep a nice, chunky shape.
Step 6: Preheat Oven and Prepare Baking Sheets
While the dough chills, preheat your oven to 350°F (175°C) and line your baking sheets with parchment paper. This step ensures the cookies bake evenly and don’t stick to the pan, preserving their perfect texture and shape.
Step 7: Shape the Dough
Using a spoon or cookie scoop, form the dough into balls and place them spaced out on the lined baking sheets. Leaving enough room between each cookie is key to allowing them to bake beautifully without merging into one another.
Step 8: Bake the Cookies
Bake for about 10 minutes or until the edges are set but the centers remain soft. This brief baking time locks in that tender middle while crisping the edges just enough for a lovely contrast in texture.
Step 9: Cool and Enjoy
Once baked, let the cookies cool on the pan for a few minutes before transferring them to a wire rack. This final step lets them firm up perfectly without losing their decadent softness inside.
How to Serve Peanut Butter Butterfinger Cookies Recipe
Garnishes
For a little extra flair, you can sprinkle a pinch of flaky sea salt on top of each warm cookie just as they come out of the oven. The salt will accentuate the sweetness and peanut butter flavor beautifully. A drizzle of melted chocolate also adds a luscious finishing touch if you’re feeling indulgent.
Side Dishes
These cookies pair marvelously with a cold glass of milk, a cup of rich coffee, or even a scoop of vanilla ice cream for a decadent dessert experience. The creamy, nutty notes in the cookie balance perfectly with creamy or bitter beverages, making every bite feel like a special treat.
Creative Ways to Present
Try stacking these cookies in a mason jar with layers of mini Butterfinger bits or crushed peanuts for a fun gift idea. Alternatively, sandwich two cookies with a layer of chocolate or peanut butter frosting to create delectable cookie sandwiches. Presentation can elevate this familiar favorite into something truly memorable.
Make Ahead and Storage
Storing Leftovers
Leftover cookies keep really well in an airtight container at room temperature for up to 5 days. Make sure they’re completely cool before storing to avoid sogginess. The peanut butter and Butterfinger pieces maintain their delightful texture beautifully during this time.
Freezing
You can freeze these cookies either before or after baking. For unbaked dough, shape dough balls and freeze on a tray until solid, then transfer to a freezer bag for up to 3 months. For baked cookies, store them in a freezer-safe container layered with parchment paper. When ready, thaw at room temperature and enjoy!
Reheating
To refresh cookies from the freezer or stored batch, warm them in a microwave for a few seconds or in a 300°F oven for 5 minutes. This brings back that freshly baked softness and makes the Butterfinger bits melty and inviting once again.
FAQs
Can I use natural peanut butter instead of Jif?
Yes, natural peanut butter works fine, but because it usually contains less sugar and more oil separation, your cookies might be slightly less sweet and a bit more crumbly. Stir well before measuring and consider adjusting sugar if desired.
Do I have to chop the Butterfinger bars myself?
Absolutely, chopping Butterfinger bars adds those perfect-sized chunks that melt just enough during baking. Pre-chopped candy might be available but chopping fresh ensures better texture control and distribution.
Can I substitute the Butterfinger candy with other bars?
You can experiment with other crunchy candy bars like Butterfinger’s close cousin Heath bars or even chopped Snickers for a different twist. Just keep in mind Butterfinger’s unique crispy peanut buttery crunch is the star here.
What is the best way to prevent cookies from spreading too much?
Chilling the dough at least 15 minutes before baking is key. You can also try baking on a cooler oven rack or using parchment paper for better results. Avoiding excess butter temperature helps maintain cookie shape.
Can I make the dough ahead of time and bake later?
Definitely! The dough can be made and stored in the fridge for up to 2 days before baking. This actually enhances the flavor and texture as the ingredients meld together beautifully.
Final Thoughts
There’s something truly special about sharing homemade treats with people you care about, and this Peanut Butter Butterfinger Cookies Recipe is one you’ll want to keep coming back to again and again. It’s fun, easy, and absolutely delicious with its perfect balance of peanut butter richness and crunchy candy bites. So grab your apron and cookie sheet—these irresistible cookies are waiting to become your new favorite indulgence!
Print
Peanut Butter Butterfinger Cookies Recipe
- Prep Time: 20 minutes
- Cook Time: 10 minutes
- Total Time: 30 minutes
- Yield: Approximately 24 cookies
- Category: Dessert
- Method: Baking
- Cuisine: American
Description
Deliciously rich and chewy Peanut Butter Butterfinger Cookies combine creamy peanut butter with crunchy Butterfinger pieces for a sweet, irresistible treat perfect for any cookie lover.
Ingredients
Cookie Dough
- 3/4 cup softened butter
- 1/2 cup granulated sugar
- 1/2 cup brown sugar
- 1 cup peanut butter (preferably Jif)
- 1 large egg
- 1 & 1/2 teaspoons vanilla extract
- 1 & 1/2 cups all-purpose flour
- 1/2 teaspoon baking soda
- 1/2 teaspoon baking powder
- 1/4 teaspoon kosher salt
Add-ins
- 16 ounces chopped Butterfinger
Instructions
- Cream Butter and Sugars: In a mixing bowl, cream together the softened butter, granulated sugar, and brown sugar until the mixture becomes light and fluffy, creating the base for your cookie dough.
- Add Wet Ingredients: Mix in the peanut butter, egg, and vanilla extract until the batter is smooth and well combined.
- Combine Dry Ingredients: Gradually add the all-purpose flour, baking soda, baking powder, and kosher salt to the wet ingredients, mixing just until incorporated to avoid overworking the dough.
- Fold in Butterfinger: Gently fold the chopped Butterfinger pieces into the dough, distributing them evenly without breaking them down too much.
- Chill Dough: Cover the dough and chill in the refrigerator for at least 15 minutes to allow it to firm up for easier handling.
- Preheat Oven: Preheat your oven to 350°F (175°C) and line baking sheets with parchment paper to prevent sticking and promote even baking.
- Shape Cookies: Scoop and shape the dough into balls, placing them on the prepared baking sheets with enough space between each cookie to allow for spreading.
- Bake: Bake the cookies in the preheated oven for about 10 minutes, or until the edges are set but the centers are still soft, ensuring a chewy texture.
- Cool: Let the cookies cool on the baking sheet for a few minutes before transferring them to a wire rack to cool completely.
Notes
- Use room temperature butter and peanut butter for easier mixing and better texture.
- Chilling the dough helps prevent spreading and keeps cookies thick and chewy.
- Feel free to swap Butterfinger with other candy bars like Snickers or Heath for different flavors.
- Store cookies in an airtight container at room temperature for up to a week.
- For extra crunch, add chopped peanuts or a sprinkle of sea salt on top before baking.


