
“`html
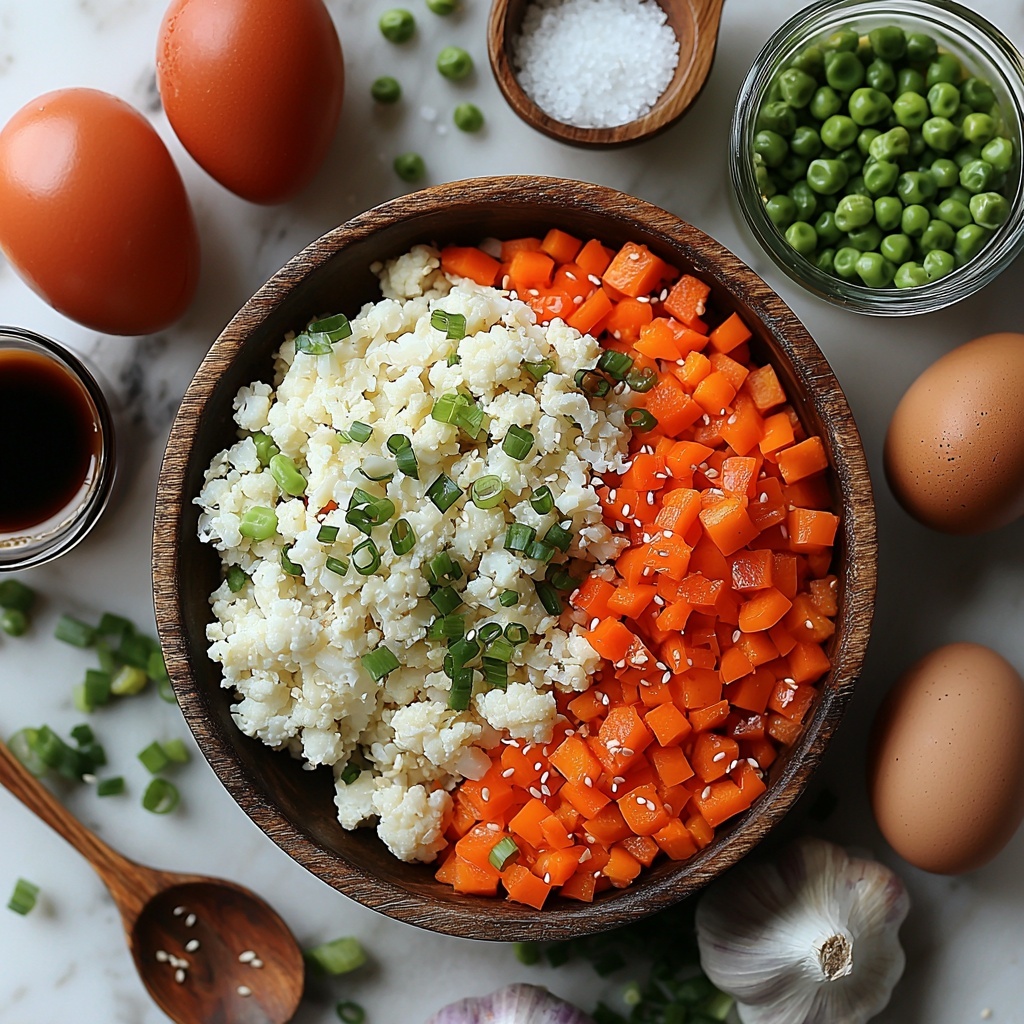
If you have been hunting for a nutritious and vibrant meal that’s bursting with flavor but light on carbs, this Cauliflower Fried Rice Recipe is exactly what you need. It brilliantly transforms humble cauliflower into a colorful, crave-worthy dish that tastes indulgent without any guilt. Combining the crisp freshness of vegetables, the comforting warmth of scrambled eggs, and the savory umami notes from soy sauce and sesame oil, this recipe feels like a restaurant favorite made in your own kitchen. Once you get the hang of it, you’ll find yourself reaching for cauliflower fried rice again and again for an easy weeknight dinner or a quick lunch that satisfies every time.
Ingredients You’ll Need
This Cauliflower Fried Rice Recipe calls for simple, wholesome ingredients that each bring something essential to the party, whether it’s texture, flavor, or vibrant color. They’re easy to find, and come together beautifully to create a dish that’s as nutritious as it is tasty.
- 3 Tbsp. oil (divided): Use a neutral oil for cooking eggs and veggies, ensuring even sautéing without overpowering flavors.
- 3 large eggs (whisked): Adds protein and a creamy texture for that classic fried rice feel.
- 1 cup white onion (finely diced): Delivers sweetness and aromatic depth once sautéed.
- 1 red bell pepper (finely diced): Brings a pop of red color and natural sweetness for balance.
- 3 cloves garlic (finely minced): Infuses savory and pungent notes that awaken the senses.
- 1 tsp. ginger paste: Provides a zesty brightness that lifts the entire dish.
- 1 ½ lbs. cauliflower rice (thawed and drained if frozen): The star of the recipe, finely processed to mimic rice grains with a gentle crunch.
- ¼ cup soy sauce or Tamari (or gluten-free Tamari): Adds salty, savory umami that ties all the ingredients together.
- 1 Tbsp. rice vinegar: A splash of acidity to keep flavors lively and balanced.
- 2 tsp. sesame oil: Imparts a nutty aroma and depth crucial in any authentic fried rice experience.
- ¾ – 1 tsp. salt (to taste): Enhances all the flavors without overshadowing the freshness.
- 1 ½ cups frozen peas and carrots (thawed): Adds a subtle sweetness and beautiful color accents.
- ¼ cup green onions: Provides a fresh, crisp finish and a mild onion flavor.
How to Make Cauliflower Fried Rice Recipe
Step 1: Scramble the Eggs
Start by heating one tablespoon of oil in a large skillet or wok over medium heat. Pour in your whisked eggs and gently scramble for about two minutes, stirring occasionally until just cooked through. This step is important because it keeps the eggs tender and separate, adding a soft texture within the dish. Once done, remove the eggs and wipe the pan clean to prepare for the vegetables.
Step 2: Sauté the Aromatics and Veggies
Add another tablespoon of oil to the pan, then toss in the finely diced white onion and red bell pepper. Sauté for 3 to 4 minutes until these vegetables become tender and fragrant. Next, stir in the minced garlic and ginger paste, cooking for just 30 seconds more to release those irresistible aromas without burning them.
Step 3: Cook the Cauliflower Rice
Now for the star ingredient, add the cauliflower rice straight into the pan along with soy sauce, rice vinegar, sesame oil, and salt. Cook over medium-high heat, stirring occasionally for about 6 to 8 minutes. This allows the cauliflower rice to soften slightly while soaking up all the flavorful sauces, resembling the texture of traditional fried rice.
Step 4: Combine Peas, Carrots, and Scrambled Eggs
In the last couple of minutes, stir in the thawed peas and carrots along with the scrambled eggs you set aside earlier. Gently toss everything together to warm the veggies through and distribute the eggs evenly. This final step locks in the sweet veggie crunch and the soft, fluffy eggs that make cauliflower fried rice so satisfying.
Step 5: Ready to Serve
Your cauliflower fried rice is now perfectly cooked—hot, flavorful, and colorful, waiting for a final flourish before enjoying. Don’t forget to add the fresh green onions right before serving to add a bit of crunch and that bright green hue we all love on a fried rice plate.
How to Serve Cauliflower Fried Rice Recipe
Garnishes
A sprinkle of chopped green onions is classic, providing freshness and sharpness that contrast beautifully with the earthy cauliflower and rich sauces. For a little heat, a drizzle of sriracha or your favorite chili oil will lift each bite with a subtle kick that wakes up your palate.
Side Dishes
This cauliflower fried rice pairs wonderfully with dishes like grilled chicken, crispy tofu, or even some simple steamed dumplings. The versatility makes it a fantastic base for weeknight dinners or an easy addition to a larger Asian-inspired spread.
Creative Ways to Present
Try serving this cauliflower fried rice recipe in individual lettuce wraps or hollowed-out bell peppers for a fun presentation twist. You can also turn it into a one-bowl meal by topping it with some chopped peanuts or toasted sesame seeds, which add texture and a nutty finish.
Make Ahead and Storage
Storing Leftovers
Leftover cauliflower fried rice keeps beautifully in an airtight container in the refrigerator for up to 3 days. Make sure it cools completely before refrigerating to preserve both texture and flavor.
Freezing
You can freeze portions of the cauliflower fried rice recipe in freezer-safe containers for up to 2 months. When ready to eat, thaw it overnight in the fridge for the best results.
Reheating
Reheat leftovers gently in a skillet over medium heat, adding a tiny splash of oil or water if needed to prevent sticking. Stir frequently to warm evenly without drying out the cauliflower and vegetables.
FAQs
Can I use fresh cauliflower instead of frozen cauliflower rice?
Absolutely! Fresh cauliflower rice can be made by pulsing cauliflower florets in a food processor until it reaches a rice-like consistency. Just be sure to dry it well to avoid sogginess during cooking.
Is this Cauliflower Fried Rice Recipe suitable for a gluten-free diet?
Yes, just be sure to use gluten-free Tamari or soy sauce to keep the dish gluten-free without sacrificing any flavor.
Can I add other vegetables to this recipe?
Definitely! Feel free to experiment with snap peas, corn, mushrooms, or even diced zucchini to make it your own. Just adjust the cooking times accordingly.
What protein options work well with this cauliflower fried rice?
Besides the eggs already included, you can add cooked shrimp, chicken, tofu, or even crispy bacon bits for an extra protein boost.
How spicy is this cauliflower fried rice?
The base recipe is mild, which makes it family-friendly. You can easily adjust the heat by adding sriracha, chili flakes, or fresh chilis according to your taste.
Final Thoughts
I hope you feel inspired to try this Cauliflower Fried Rice Recipe at home—it’s a simple way to enjoy big flavors and wholesome ingredients all in one bowl. Perfect for any meal of the day, this recipe is bound to become a staple in your cooking rotation. Happy cooking and even happier eating!
“`
Print
Cauliflower Fried Rice Recipe
- Prep Time: 10 minutes
- Cook Time: 15 minutes
- Total Time: 25 minutes
- Yield: 4 servings
- Category: Main Course
- Method: Stovetop
- Cuisine: Asian
- Diet: Gluten Free
Description
This Cauliflower Fried Rice recipe is a healthy and flavorful alternative to traditional fried rice, using finely chopped cauliflower as a low-carb rice substitute. It combines scrambled eggs, sautéed vegetables, and a savory sauce with soy and sesame for a delicious and quick meal suitable for a variety of diets.
Ingredients
Eggs and Oil
- 3 Tbsp. oil (divided)
- 3 large eggs (whisked)
Vegetables
- 1 cup white onion (finely diced)
- 1 red bell pepper (finely diced)
- 3 cloves garlic (finely minced)
- 1 ½ lbs. cauliflower rice (thawed and drained if frozen, about 1 large head)
- 1 ½ cups frozen peas and carrots (thawed)
- ¼ cup green onions (chopped)
Seasonings and Sauces
- 1 tsp. ginger paste
- ¼ cup soy sauce or Tamari (or a gluten-free Tamari)
- 1 Tbsp. rice vinegar
- 2 tsp. sesame oil
- ¾ – 1 tsp. salt (to taste)
Instructions
- Scramble the eggs: Heat 1 tablespoon of oil in a large skillet or wok over medium heat. Add the whisked eggs and cook, stirring occasionally, for about 2 minutes until scrambled. Remove the eggs from the pan and wipe the pan clean with a paper towel.
- Sauté vegetables: Add another tablespoon of oil to the pan and add the diced onion and red bell pepper. Sauté for 3 to 4 minutes until the vegetables are tender. Stir in the minced garlic and ginger paste and cook for an additional 30 seconds to release their flavors.
- Cook cauliflower rice: Add the cauliflower rice to the pan along with soy sauce, rice vinegar, sesame oil, and salt. Increase the heat to medium-high and cook for 6 to 8 minutes, stirring occasionally to prevent sticking and to evenly distribute the seasonings.
- Combine peas, carrots, and eggs: Stir in the thawed peas and carrots along with the scrambled eggs during the last 2 minutes of cooking to warm through and combine the flavors.
- Serve: Garnish the fried rice with chopped green onions and serve immediately. Optionally, add sriracha sauce for a spicy kick. Enjoy your healthy cauliflower fried rice!
Notes
- Make sure the cauliflower rice is well thawed and drained if using frozen to avoid excess moisture.
- Adjust salt and soy sauce according to taste and dietary preferences.
- For a gluten-free option, use tamari instead of soy sauce.
- This dish can be customized with additional vegetables or proteins like shrimp or chicken.
- Use a large skillet or wok for even cooking and to prevent overcrowding.
- Leftovers can be refrigerated for up to 3 days and reheated well.


