
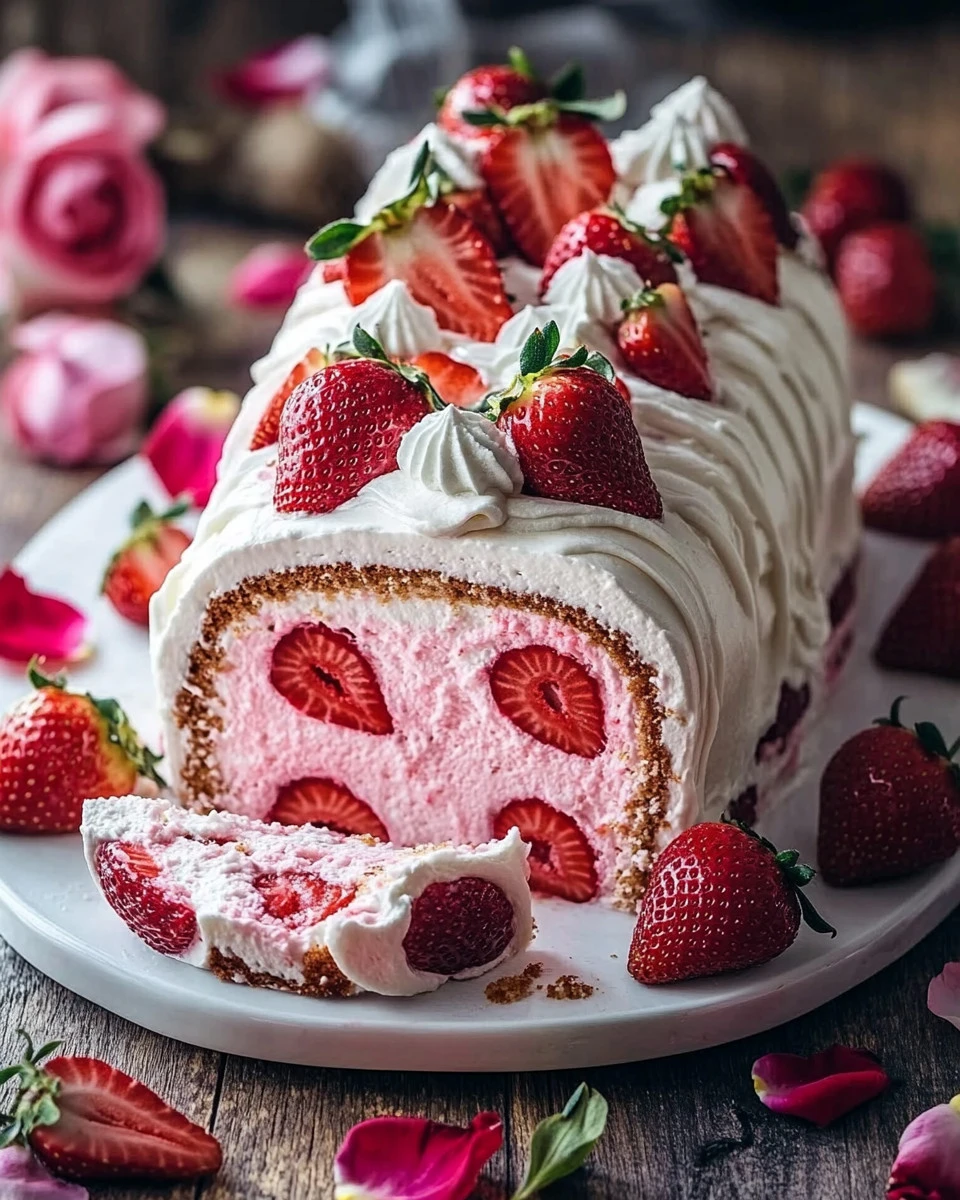
5 Steps to Create Irresistible Frozen Strawberries and Whipped Cream
If you’re searching for a refreshing dessert that’s perfect for any occasion, look no further than this delightful Frozen Strawberries and Whipped Cream recipe. It’s not only visually stunning but also a crowd-pleaser among family and friends. Whether you’re hosting a summer get-together or simply indulging in a sweet treat at home, this dessert is sure to impress. In just five simple steps, you’ll learn how to create this delectable dessert that highlights the freshness of strawberries.
Ingredients You’ll Need
Before you begin, gather the following ingredients:
- 4 eggs
- 120 g of sugar
- 120 g of sifted flour
- 1 pinch of salt
- 300 g of fresh strawberries
- 200 ml of very cold whole liquid cream
- 100 g of icing sugar
- 3 gelatin sheets (or 6 g gelatin powder)
- 200 ml whole liquid cream (for whipped cream)
- 30 g of icing sugar
- 150 g of fresh strawberries (whole or cut)
- Sugar petals or white chocolate chips (optional)
Step 1: Prepare the Genoise
To start, preheat your oven to 180°C (static heat). In a large mixing bowl, whisk together the 4 eggs and 120 g of sugar for about 5-7 minutes until the mixture has tripled in volume. This step is crucial, as it creates a fluffy texture that gives your dessert an elegant touch.
Gently fold in the 120 g of sifted flour and 1 pinch of salt using a spatula to maintain the airiness of the batter. Once combined, spread the mixture evenly on a baking sheet lined with baking paper. Bake in the preheated oven for approximately 10 minutes. Once done, remove the genoise from the oven and roll it in a damp cloth to cool. This technique will help keep your cake moist and make it easier to roll later.
Step 2: Make the Strawberry Mousse
While the genoise is cooling, it’s time to prepare the luscious strawberry mousse. Start by softening the gelatin sheets in cold water for about 5 minutes. Meanwhile, blend 300 g of fresh strawberries into a smooth puree.
Heat the puree slightly in a small saucepan, then add the softened gelatin and mix until completely dissolved. Let the mixture cool to room temperature. In a separate bowl, whip 200 ml of very cold liquid cream until it forms soft peaks. Gradually add 100 g of icing sugar, continuing to whip until you reach firm peaks. Carefully fold the chilled strawberry puree into the whipped cream, creating a light and airy mousse that will complement your genoise perfectly.
Step 3: Assemble the Log
Now comes the fun part: assembling your beautiful dessert! Carefully unroll the cooled genoise and spread a generous layer of the strawberry mousse on top. To add extra flavor and texture, sprinkle 150 g of fresh strawberry chunks over the mousse. Next, roll the genoise tightly, ensuring that the mousse is secure inside. Wrap the rolled cake in plastic wrap and place it in the freezer for at least 4 hours to set properly. This step is essential for achieving that delightful frozen texture.
Step 4: Create the Whipped Cream Topping
Once your cake has set, it’s time to prepare the whipped cream topping. In a mixing bowl, whip 200 ml of liquid cream with 30 g of icing sugar until it reaches firm peaks. Use a piping bag to cover the entire log with the whipped cream, creating beautiful swirls if you like. This addition not only enhances the visual appeal but also adds a delightful creamy layer to each serving.
Step 5: Decorate and Serve
For the final touch, arrange whole strawberries on top of the whipped cream log and sprinkle with sugar petals or white chocolate chips for that extra wow factor.
Your stunning Frozen Strawberries and Whipped Cream dessert is now ready to serve!
Whether it’s a sunny Sunday afternoon or a festive gathering, this dessert is guaranteed to be a hit. You can find more delightful recipes like this on Wife’s Recipes. So, roll up your sleeves and treat your loved ones to this refreshing dessert! For additional tips and variations, check out more articles or resources related to frozen desserts to expand your culinary repertoire.