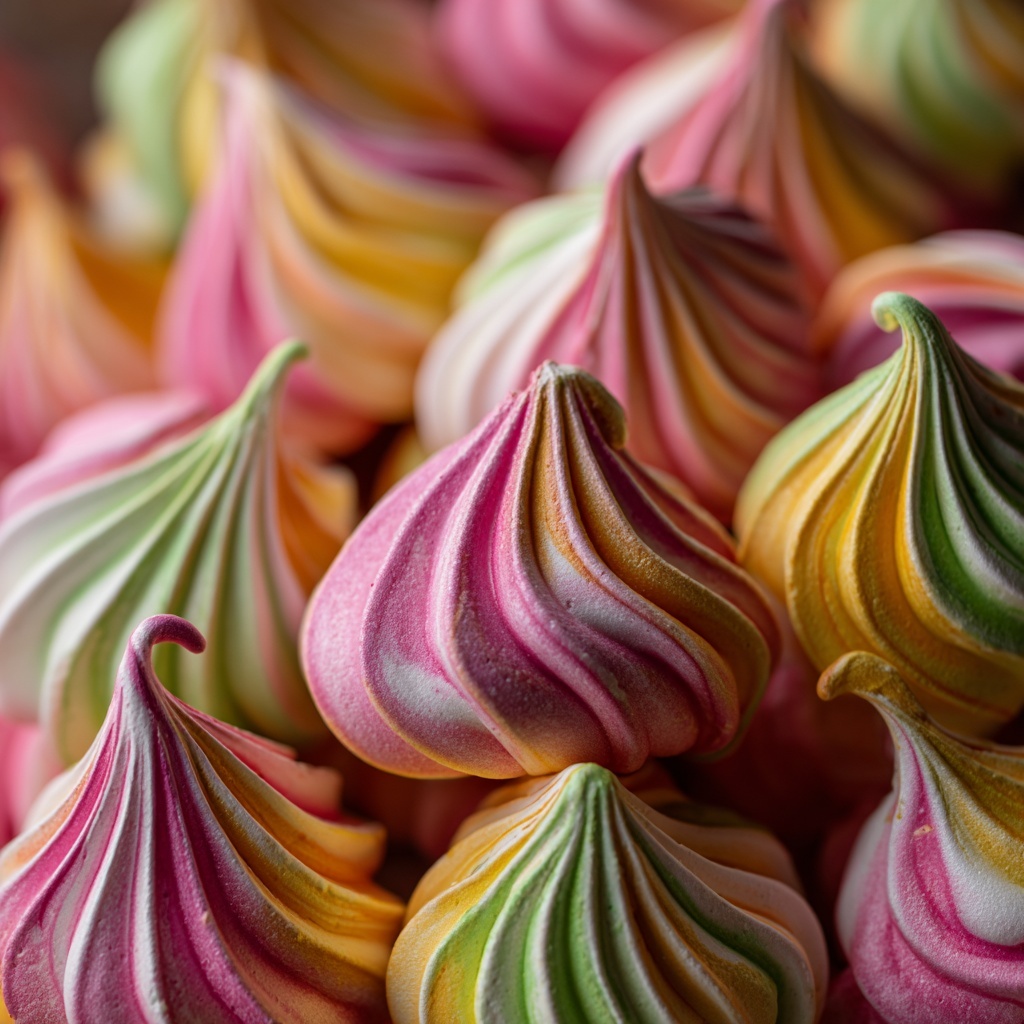
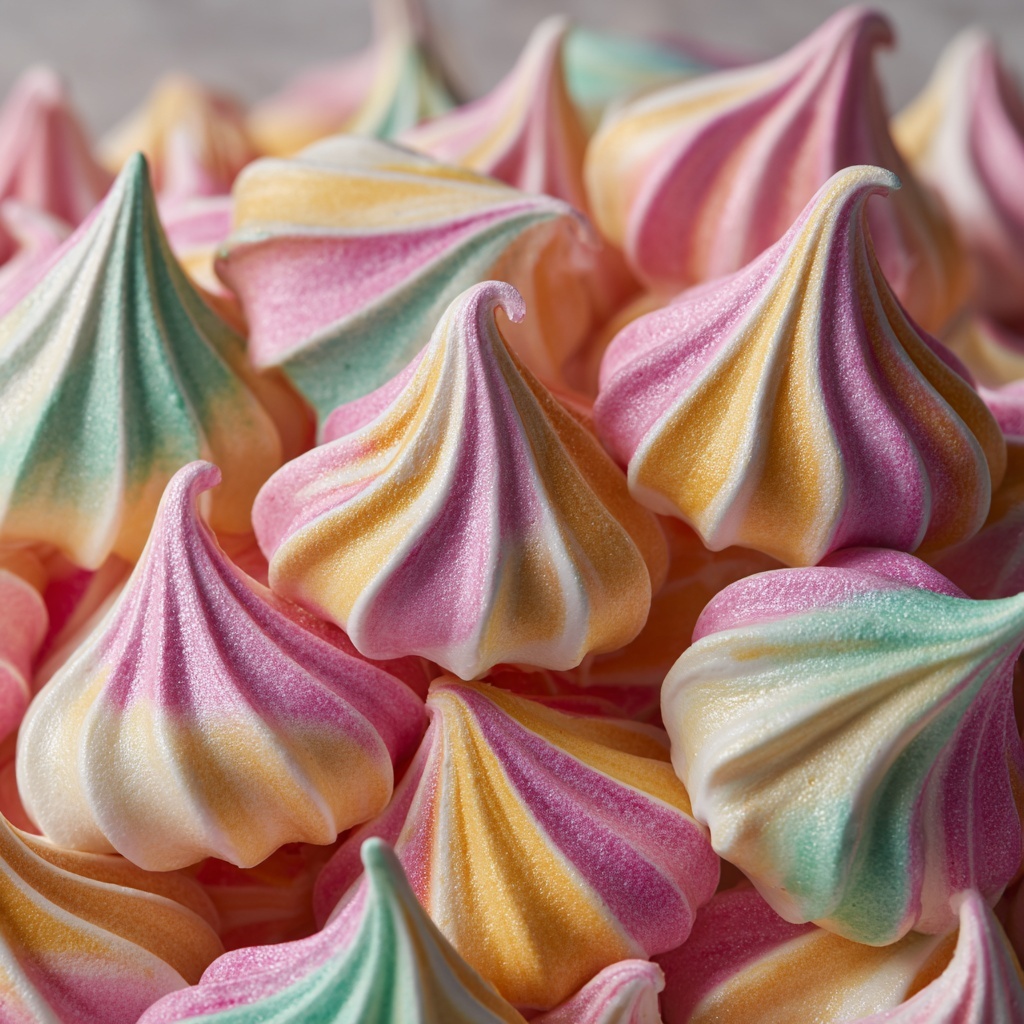
If you are looking for a delightful treat that captures the vibrant colors and tart sweetness of classic sherbet, this Rainbow Sherbet Meringues Recipe is exactly what you need. These airy meringue cookies bring a burst of color and a delightful melt-in-your-mouth texture, combining the pure sweetness of whipped egg whites with a playful mix of citrusy, sherbet-inspired hues. Perfect for parties, baby showers, or just a fun weekend project, these meringues will brighten your dessert table and your day with their whimsical look and light, crisp bite.
Ingredients You’ll Need
The magic of this Rainbow Sherbet Meringues Recipe lies in its simplicity. Each ingredient plays a key role in creating that perfect balance of texture, flavor, and those beautiful sherbet-inspired colors.
- 4 large egg whites, at room temperature: These provide the airy base and structure for your meringues.
- 1 cup granulated sugar: Sweetens and stabilizes the meringue for that glossy, stiff finish.
- ½ teaspoon cream of tartar: Helps stabilize the egg whites to maintain volume and texture.
- 1 teaspoon vanilla extract: Adds a subtle warmth and depth to the flavor without overpowering.
- Gel food coloring in orange, pink, and green: Offers vivid, sherbet-inspired colors without thinning the batter.
- Optional: ¼ teaspoon citrus zest (lemon, lime, or orange): Provides a fresh burst of flavor to echo real sherbet tanginess.
How to Make Rainbow Sherbet Meringues Recipe
Step 1: Prepare Your Oven and Pans
Preheat your oven to a low 225°F. Line two baking sheets with parchment paper to prevent sticking and ensure an easy release once baked. This low temperature is crucial for drying rather than browning your meringues, keeping them light and crisp.
Step 2: Whip the Egg Whites
In a clean, dry mixing bowl, begin beating the room-temperature egg whites on medium speed until frothy and foamy. Then add the cream of tartar; this boosts stability and encourages stiffening. Continue beating until you see soft peaks form, which means the egg whites have started to hold shape but are still slightly droopy.
Step 3: Add Sugar Gradually
Slowly add sugar one tablespoon at a time while whipping on high speed. This method helps the sugar dissolve fully, ensuring a smooth, glossy meringue without graininess. Beat until stiff peaks form — when the mixture stands tall and holds its shape firmly, with a shiny surface that gleams with promise.
Step 4: Flavor and Color
Next, beat in vanilla extract and if you choose, your citrus zest. This is where your Rainbow Sherbet Meringues Recipe really starts to come alive with flavor. Then carefully divide the meringue into three bowls, tinting each with a gel food coloring: orange, pink, and green or your sherbet-favorite shades. Using gel colors is key as they won’t thin your meringue.
Step 5: Pipe the Colorful Mounds
Thanks to their vibrant hues, the meringues are as fun to make as they are to eat. Using a spatula, spoon alternating stripes of each colored meringue into a piping bag fitted with a large star or round tip. Pipe approximately 1½-inch mounds onto the prepared baking sheets, leaving space between each to allow gentle drying during baking.
Step 6: Bake and Cool
Bake the meringues for 1 hour. Once the timer goes off, turn the oven off and leave the meringues inside to cool for an additional hour. This slow cooling helps to prevent cracking and keeps them dry and crisp throughout, a step that truly elevates your finished cookies to perfect sherbet-like lightness.
How to Serve Rainbow Sherbet Meringues Recipe

Garnishes
To make your Rainbow Sherbet Meringues Recipe presentation truly pop, sprinkle with a bit of extra citrus zest or edible glitter that catches the light. A few small fresh mint leaves alongside offer freshness and a lovely contrast in color and flavor.
Side Dishes
These meringues shine best when paired with something creamy. Serve alongside a scoop of vanilla ice cream or a light fruit sorbet to complement the sherbet theme. Fresh berries or a citrus fruit salad add a juicy burst that accentuates the meringue’s crisp sweetness.
Creative Ways to Present
For a beautiful display, arrange meringues in a glass jar layered with whipped cream and fresh fruit for a quick parfait. Alternatively, use them as toppers for cupcakes or as colorful edible accents on cakes to surprise your guests with both texture and flavor.
Make Ahead and Storage
Storing Leftovers
Rainbow Sherbet Meringues hold their crisp charm best when stored in an airtight container at room temperature, away from humidity. This helps maintain their light texture and vibrant colors for up to a week.
Freezing
If you want to save your meringues longer, they freeze beautifully. Just place them in a sealed container with parchment paper between layers and freeze. When ready to enjoy, thaw at room temperature without opening the container until completely defrosted.
Reheating
Because meringues are all about that crisp bite, reheating isn’t necessary. If you prefer them slightly warm, a very brief stint in a low-temperature oven (about 200°F for 5 minutes) can refresh their texture without softening.
FAQs
Can I use regular food coloring instead of gel?
Gel food coloring is highly recommended for this Rainbow Sherbet Meringues Recipe because it doesn’t add extra liquid that could deflate your delicate egg whites. Regular liquid colors may cause your meringue to become runny and lose volume.
Why do the meringues need to cool in the oven?
Cooling them slowly in the turned-off oven helps prevent cracks and ensures they dry out thoroughly, creating that iconic crispy exterior with a melt-in-your-mouth center. Opening the door too soon can cause sudden temperature changes, which may cause breakage.
Can I make these without citrus zest?
Absolutely! The citrus zest is optional and adds a lovely sherbet-inspired brightness, but the meringues are fantastic even without it. Vanilla and the colorful presentation give plenty of flavor and visual appeal.
What if my meringues are sticky after baking?
Sticky meringues usually mean there was too much humidity during baking or they weren’t dried out enough. Make sure your oven temperature is correct and avoid baking on particularly humid days for the best results. Properly cooled meringues should be crisp and dry.
How long do these meringues keep their color?
The vibrant colors from gel food coloring hold up well when stored properly in an airtight container. Avoid moisture exposure and keep them out of direct sunlight to maintain their cheerful rainbow sherbet hues.
Final Thoughts
This Rainbow Sherbet Meringues Recipe is such a joyous treat to make and share. Its playful colors and delicate crunch bring smiles with every bite. Whether you’re celebrating a special occasion or just want a bright, cheerful dessert to enjoy, these meringues deliver both flavor and fun. Give this recipe a whirl and watch your kitchen light up with sherbet-colored happiness!
Print
Rainbow Sherbet Meringues Recipe
- Prep Time: 20 minutes
- Cook Time: 1 hour
- Total Time: 2 hours
- Yield: 30 meringues
- Category: Dessert
- Method: Baking
- Cuisine: American
- Diet: Gluten Free
Description
These Rainbow Sherbet Meringues are light, airy, and delightfully colorful cookies made from whipped egg whites and sugar, tinted in vibrant sherbet-inspired hues. Perfect for parties or as a whimsical sweet treat, they offer a crisp texture and melt-in-your-mouth sweetness with a hint of citrus for added brightness.
Ingredients
Base Ingredients
- 4 large egg whites, at room temperature
- 1 cup granulated sugar
- ½ teaspoon cream of tartar
- 1 teaspoon vanilla extract
Coloring & Flavor
- Gel food coloring in orange, pink, and green (or colors of your choice to mimic rainbow sherbet)
- Optional: ¼ teaspoon citrus zest (lemon, lime, or orange) for extra flavor
Instructions
- Preheat and Prepare: Preheat your oven to 225°F (107°C) and line two baking sheets with parchment paper to prevent sticking.
- Beat Egg Whites: In a clean, dry mixing bowl, beat the egg whites using an electric mixer on medium speed until they become foamy.
- Add Cream of Tartar and Beat to Soft Peaks: Add the cream of tartar and continue beating until the egg whites form soft peaks, which means they hold a gentle peak when the beaters are lifted.
- Incorporate Sugar Gradually: Gradually add the granulated sugar, one tablespoon at a time, while beating on high speed. Continue beating until the mixture is glossy and stiff peaks form, indicating the meringue is stable and shiny.
- Flavor the Meringue: Beat in the vanilla extract and optional citrus zest to enhance the flavor.
- Divide and Color: Divide the meringue mixture equally into three separate bowls. Tint each bowl with gel food coloring—orange, pink, and green or your chosen sherbet colors.
- Prepare for Piping: Using a spatula, gently spoon alternating stripes of each colored meringue into a piping bag fitted with a large star or round tip to create layered color effect when piped.
- Pipe Meringues: Pipe 1½-inch mounds onto the prepared baking sheets, spacing them slightly apart to allow for drying.
- Bake: Bake the meringues in the preheated oven for 1 hour to dry them out gently without browning.
- Cool Meringues: After baking, turn off the oven and let the meringues cool completely inside the oven for another hour without opening the door to prevent cracking.
- Store Properly: Once completely cool, remove the meringues and store in an airtight container to maintain their crisp texture.
Notes
- Use gel food coloring to avoid thinning the meringue, which can affect texture.
- Humidity impacts meringue texture; for best results, prepare on a dry day.
- These meringues make excellent party favors, baby shower treats, or colorful edible gifts.
